by Bob Tucker
There is so much mystery surrounding the CIS (continuous injection system) fuel system Bosch has dubbed K Jetronic, I wanted to try and make some sense of it for all Porsche owners. The bits of the system include the fuel pump, pre-pump on some models, fuel filter, accumulator, fuel distributor, warm-up regulator, injectors, auxiliary air valve, air sensor plate, cold start valve, thermo-time sensor and on newer models an oxygen sensor, frequency valve and mixture control unit were added.
|
Pump- Electrical roller type with a check valve to prevent backflow and a relief valve in case of restriction. Accumulator- Large spring loaded diaphragm to keep fuel pressure up with engine off, also dampens pulses from the pump. Warm-up regulator- An electrically heated bi-metallic strip operates a valve that controls fuel pressure to the fuel distributor. Many WURs have a vacuum diaphragm that provides enrichment during acceleration. Fuel distributor- Control center, contains a regulator to keep system pressure constant. The main moving part is a central pin which is controlled by the air sensor plate. When the throttle is opened the increase of air into the manifold causes the air sensor plate rises and pushes the control pin into the FD which allows fuel out to the injectors. Mixture adjustment is via the 3 mm allen screw, turning the screw clockwise makes the mixture richer, remember lean "out".
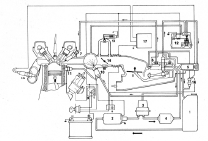
Injector- Mechanical valve that "pops" when the fuel pressure reaches approximately 45 psi (3 bar). All injectors in a CI system spray at the same time the same amount, there is no timing as with mechanical injection. Auxiliary Air Valve- A mechanical door that is controlled by a electrically heated bi-metallic strip. When cold the AAV bypasses the throttle plate to allow a fast idle. Air sensor plate- Balance beam activated by incoming air to the intake manifold. As air pushes the plate up the control pin also is pushed into the fuel distributor. Cold Start Valve- Sprays fuel into the intake plenum while the starter is cranking. Thermo-Time Sensor- This sensor detects the temperature of the cylinder head and when below a prescribed temp allows the cold start injector to spray fuel. Oxygen Sensor- A special ceramic that senses the difference between the O2 in the exhaust (or lack thereof) and the ambient O2 and produces a voltage which is sent to the Lambda Control Unit to adjust the CO in real time. The voltage fluctuates between a few millivolts and just less than 1 volt. {mospagebreak} Check the diagram below for a crude schematic of how the CIS system works. The diagram I found is from some, dare I say it, water cooled engine. Click on image for full size
Let's take it from a cold start. Cranking the starter triggers the cold start valve to spray into the intake plenum on early models. Due to flooding problems a thermo-time sensor was added to prevent the cold start valve from spraying fuel for more than 8 seconds as well as when the engine temp was greater than 120 F (?). The control pin in the fuel distributor moves according to how much air deflects the air sensor plate and is also affected by control pressure. Control pressure acts on the top of the control pin, cold control pressure is low (14 psi depending on model) which lessens the resistance of the air sensor plate to rise. As engine temp comes up the control pressure rises and the resistance increases leaning out the mixture (hot control pressure is 50 psi).
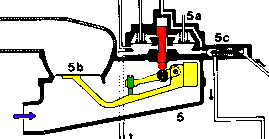
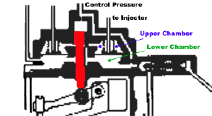
The guts of the fuel distributor determines how much fuel is output to the injectors. There are 2 chambers separated by a stainless steel diaphragm, the lower chamber is system pressure set by a small spring and is adjustable but almost never necessary. When the control pin rises this allows system pressure into the upper chamber, once the pressures in both chambers are equal the spring pressure deflects the diaphragm and lets fuel out to the injectors. Note the diagram below.
{mospagebreak} Troubleshooting the system Some common problems to be aware of are: No start- Fuel pump relay bad, listen for pump noise just after clicking the starter. Later models have a switch that will cutoff the pump if the engine dies. It works off the air sensor plate as long as the plate is off the stop the pump will run. You can bypass the relay if you suspect it is the culprit. Pumps do go bad but normally give you a warning such as excessive noise. Starts hard cold- This is almost always the warm up regulator. High cold control pressure will make the mixture very lean. The cold start valve will still spray and you will likely fire up for a second or two and then die. In order to see what your control pressure is you will need a set of special gauges which are available at most auto parts houses. Keep in mind that you have fuel pressure at all times, even with the engine off, so be careful when attaching fuel pressure gauges. Starts hard hot- A couple things to look at are system pressure at rest, and CO setting. If the check valve won't hold rest pressure you will have a heck of a time getting going again after the car sits for 5 minutes. The spec for holding system pressure is that it must hold at least 20 psi for 1/2 hour. CO setting is hard to adjust properly if you don't have an exhaust analyzer but there is a way to get very close. Get your engine to normal operating temperature. If you have an O2 sensor unplug it. Use a vacuum gauge on manifold vacuum, not on the distributor line, and using your 3 mm allen key lean out (counter-clockwise) the mixture until the engine just starts to stumble. The gauge should read about 15 at this point. Now slowly richen the mixture a little at a time, pausing to remove the allen key from the screw until the vacuum is at it's highest point. You may want to rev the engine a bit between adjustments. If you have a car with an O2 sensor you can use a voltmeter to get a bit closer. Unplug the O2 sensor and tap into the wire that sends the mixture signal, on single wire O2 sensors no problem, on sensors with three wires two are for the heater and the other is the signal. I can't remember which one is the signal so just try each one until you get a small voltage. As you lean out the mixture you will see that the voltage will decrease and vice versa. You can use an analog or digital meter. The correct mixture setting will be when the duty cycle is about 50%, this means that the time that the voltage is low will be about the same as when it's high. Be careful when adjusting CO as a small turn of the allen screw translates to a large CO change. Once you have the CO set plug your O2 sensor back in and road test the car. No fast idle- To change the idle speed on a car with fuel injection you bypass air around the throttle plate, in other words make a controlled vacuum leak. If you don't have a fast idle take a look at the auxiliary air regulator, in a cold state you should be able to see through it. Check out all the hoses that have to do with vacuum for cracks. Erratic Idle- Again check out all vacuum lines for leaks. Some models have a throttle controller sometimes called a decel valve. The decel valve lets the idle down slowly to decrease oxides of nitrogen (NOX). Disable the valve to eliminate it as a problem by plugging the vacuum line at the top of the valve. Newer models, starting in 82 I think, have an idle speed controller. It's basically an electric motor that pulses back and forth to change the idle speed. In the past I have tried cleaning and even disassembly to try and avoid the cost of replacement, success is only short lived. Use a small hammer to tap on the idle controller to see if speed changes. What happens to the controller is the bushings get worn and bound not allowing for small changes. More tips will be added as I remember or other members add their experiences. |


