
Driver Education track events are intended to provide a basic foundation of knowledge which become building blocks to advancing skills as you continue with track driving.
Students are taught to drive safely around the track in a non-competitive environment under the supervision of a track instructor riding in the car.
Students can expect (and are expected) to learn the following:
- How to drive the basic line of the track.
- How to use turn-in cones, apex cones and track-out cones as track markers.
- Braking, shifting and turning techniques and sequence for turns.
- Names of turns and straights of the track and other track vocabulary
- Safety - Being comfortable and having fun!!!
Driving the Line of the Track
You will hear much talk about THE LINE. This is not an actual physical line on the track but rather the shortest, most efficient and safest way to get around the track using the entire track surface from one side to the other. It is very important to know where to be on the track ...to be ON THE LINE... so that each turn can be driven correctly.
Diagram A shows the correct line through the turn shown. By using this line the turn can be taken at speed and requires the least amount of traveling distance from the entry to the exit of the turn. The arc of the turn is less severe and the more sweeping motion demonstrates how the entire track is used.
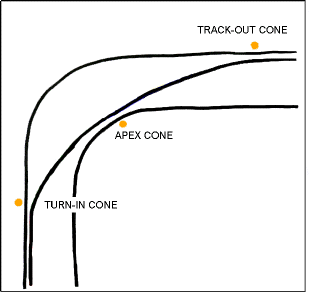 Diagram A
Diagram B shows the incorrect way to make the same turn. As a result the distance through is longer and it cannot be taken safely at speed. The arc of this turn is sharp...much more severe than in diagram A. The entire track is not used.
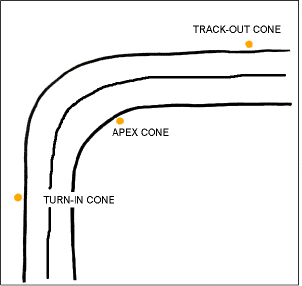 Diagram B
The turn-in cone, apex cone and track-out cone become important road signs in helping the driver find THE LINE.
TURN-IN, APEX AND TRACK-OUT CONES: Using them as markers to find the line.
TURN-IN CONE: In diagram A the turn-in cone is obvious at the bottom left of the diagram. Note that this is the point in every turn when turning into the corner should begin. As you begin turning you will be looking for the next cone on the inside of your turn. This is the APEX cone.
APEX CONE: This cone in diagram A is at the middle of the arc for that turn. The turn, when made correctly, will be one smooth flowing motion. Turn the steering wheel beginning at the turn-in cone, look for and drive towards the apex cone, then track-out to the far edge of the track...all in one smooth motion. Note that in diagram A the whole track is used.
TRACK-OUT CONE: After passing the apex cone as closely as possible, let the car drift to the far side of the track ....sometimes there is a cone at this location and it is referred to as the track-out point. It is now that the turn is complete and you are looking ahead to the next turn...the next turn-in cone.
Turns should be made as smoothly as possible, without jerking the steering wheel. Always look ahead...the car will go to where you are looking. Ask your instructor to talk you through each turn.
Braking, shifting and turning techniques and sequence for turns
BRAKING: Always brake with the wheels straight. Do NOT use the brakes while turning. ALL BRAKING NEEDS TO OCCUR BEFORE A TURN WHEN THE WHEELS ARE STRAIGHT. The word "lift" is sometimes used to describe letting off the gas pedal to slow down. Lifting, as braking, should not be done while turning.
SHIFTING: Do not shift while turning...always shift with the wheels straight. Do all shifting before starting a turn and while the steering wheel is straight. Ask your instructor when to shift.
TURNING TECHNIQUES: While turning, keep the power steadily on or increase smoothly. Don't brake in turns...don't lift in turns.
Use the entire track...all traffic is going the same way so you can drive on both sides! Remember...turn-in cone...to apex cone....track-out...smoothly. Do not make severe, jerky motions with the steering wheel. Use a smooth, firm motion to minimize the turning of the wheel.
When you are at the end of a straight and have acquired considerable speed, so not use downshifting to slow the car....brake first then downshift. The brakes, not the transmission, should be used in slowing the car.
Make a smooth transition from brake to throttle to brake. Avoid any jerky motions on brake or throttle which might unsettle the car.
REMEMBER: SMOOTH.....SMOOTH.......SMOOTH !!!
SEQUENCE FOR TURNS: In negotiating a turn there is a definite sequence of events that must occur in order to efficiently enter and exit that turn. It is important to practice this sequence, working on smoothness in each of the steps. The following sequence of events leads to a successful turn:
1. LIFT - let up on the gas pedal (wheels straight).
2. BRAKE - apply brakes (wheels straight).
3. SHIFT - downshift to a lower gear to maintain torque which enables acceleration out of the turn (not all turns require downshifting).
4. TURN - turn the wheel to initiate the turn. Eyes should be looking through the turn for the apex cone and head should be straight ...let the hands follow the eyes.
5. THROTTLE - apply the gas in an even and constant manner to maintain speed in a corner and to accelerate out of the corner.
LIFT...BRAKE.....(downshift if necessary)...OFF BRAKE....TURN....SQUEEZE THROTTLE......
NAMES OF TURNS AND STRAIGHTS (LIME ROCK)
Following the Diagram of Lime Rock Park below, the sequence of turns and straights coming onto the track from the pits is as follows:
from the Pits.....to "Big Bend"....through "The Esses" (left hander followed by a right hander)....on to "No Name Straight"...then turn onto the "Uphill"...to the "Back Straight"....to "West Bend"....under the bridge, then to the "Downhill"....past "Start / Finish"...to "Big Bend".....
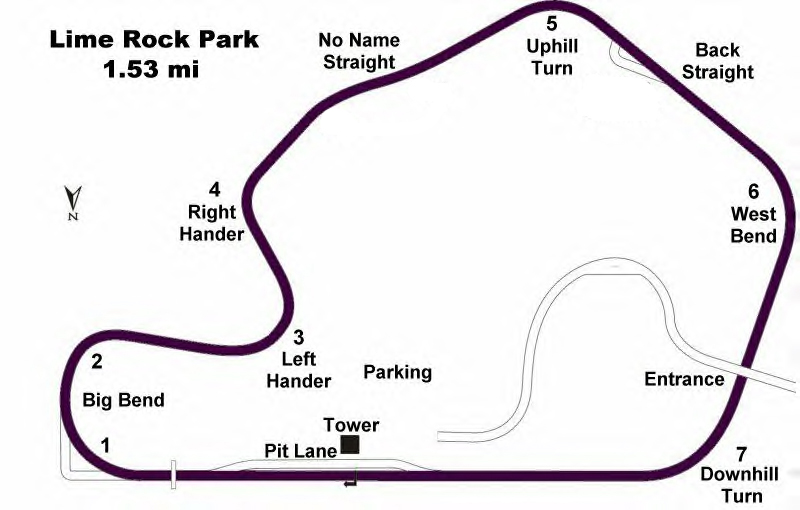
Familiarize yourself with this map and learn the names of the turns, this will assist your instructor in communicating with you. Click on map for larger version
TRACK VOCABULARY
As in any activity you may participate in, there is a special vocabulary that accompanies Drivers Education. Please become familiar with the following terms and their meaning. Don't hesitate to ask any track veteran the meaning of a word if you aren't clear....this is especially crucial when driving with your instructor. There are no stupid questions! Ask, Ask, Ask!
APEX - the middle point of the turn.
APEX CONE - marks the mid point of a turn.
DOUBLE APEX - some long turns have a "double apex"....ask your instructor....
EARLY APEX - turning in to apex a bit earlier than should.
GRID TECH - at-track inspection of cars prior to starting event.
HEEL AND TOE - right foot fancy braking: brake pedal and accelerator depressed at the same time during downshifting / braking.
IF YOU SPIN BOTH FEET IN - if you start to spin, depress clutch and brake pedal all the way in, hard! Come to a complete stop.
LATE APEX - turning in to apex cone a bit later than should.
LIFTING - letting up on the gas pedal. Don't do this in a turn.
OFF TRACK EXCURSION - you went off the track...try to do so in as straight a line as possible. Do not re-enter until told to do so by flaggers.
PADDOCK - area behind pits where drivers park their cars, park trailers, stow gear, change tires, etc.
PASSING SIGNALS - car being passed stays on line and indicates car behind can pass on right by putting left arm out window, elbow bent, finger pointing over the car; to indicate car behind can pass you on the left, extend left arm out window and point to the left.
PIT AREA - area next to track where cars come in from track and out go out onto track...usually in front of tower and start / finish.
PIT IN - place where cars enter pit area from track.
PIT IN SIGNAL - left arm out the window, bent at elbow, hand in a fist: indicates to other cars you are going into the pits.
PIT OUT - place where cars go out onto track.
RUN GROUP - group of drivers assigned to be on the track at the same time you are. Drivers are assigned according to number of track days and ability. There are generally 5 run groups: green (beginner), yellow, white, black and red (instructor).
STAGING - the 10 minutes prior to your run group being allowed on the track (thus the last 10 minutes of track time for the run group ahead of you)...all cars in your run group assemble in the pit area...belt in, adjust mirrors, put on helmet, etc.
TRACK OUT POINT - marking / cone on track denoting where on track you should be ending your turn.
TURN IN CONE - cone at the beginning of the turn denoting where on the track you should commence the turn.
TWO SPIN RULE - in you have 2 spins, 2 off courses or a combination of these, you will not be allowed to enter the track again during this drivers education event.